Showing posts with label creativexpress. Show all posts
Showing posts with label creativexpress. Show all posts
Wednesday, August 10, 2011
Where's My Cape?
When I found out my assignment was to use the Superman cartridge, I honestly thought I would have a tough time coming up with a layout to use it on. But, when it arrived and I looked though the handbook, I realized there’s so much more to it than just the man of steel. When I saw the Supergirl cut, my wheels started turning. What mom out there ISN’T a supermom? We all need our own cape!

Wednesday, August 3, 2011
Three Dimensional Christmas ornaments, and a little tip.
When I saw the lacy cuts on the Trim the Tree cartridge, I knew I wanted to create something elegant with them. To make each ornament, I cut the background four times, and the lacy portion 4 times. I adhered each lacy part to each background part. That gave me 4 complete cuts. I took each cut and folded it down the middle. I then took all four folded cuts and glued them together back to back, with a ribbon loop glued into the middle. I dry brushed the stickles over the ornaments for added sparkle and shine.


Now you have two totally different looks, using only one product:


I just love the versatility of Stickles. Depending on how you use them, you can get glittery dimension, or you can get an all over soft sparkle.
For dimension, just apply the Stickles straight out of the bottle, like this:


Now you have two totally different looks, using only one product:

Wednesday, July 27, 2011
Betty Lou Layout
I love all things 50’s so this cartridge was a must-have for me! There are so many iconic images on this cart, I had trouble picking which ones I wanted to use, but when I decided to scrap a picture of my 57 Chevy, there was the perfect cut in the manual. This cartridge also has an awesome 50’s style font. That alone makes this cartridge worth having, the tons of other cuts are just an added bonus!
I started my layout by cutting two rectangles of the patterned paper and positioning them on my white background. Then I added the die cuts and title. I added the jewels in the corners because I just have to have some bling on almost every project. Lastly, I added the three stripes in the bottom corner because they somehow remind me of a car. (I don’t know how, but they do!)

Wednesday, July 20, 2011
Kid's Birthday Cards
Since my assignment was to make birthday cards for children, I knew I wanted to make them bright, cheery, and fun. I chose the dog and cat from the Create-A-Critter cartridge because they are so cute. I also used the dog dish and cupcake from the same cartridge so this little doggie would have a birthday treat. Since these were meant for kids, I didn’t want to make them too fussy. I stuck with simple shapes and bright colors, because that seems to appeal to children. (All cuts on both cards came from Create-A-Critter)


Wednesday, July 13, 2011
Children's Invitations
I used the Old West cartridge for all of my cuts on both invitations. I love the great cuts on this cartridge and I knew they would make perfect kid’s invitations. On the Wanted invitation, I used the great cuts and fonts to make a “Wanted” poster for a western themed birthday party. I carried on that theme with the farm party invitation by using the great barn cut. When I saw those barn doors, I decided to make them actually open and find the wording inside the barn.


Wednesday, July 6, 2011
Winter Cards
For my winter themed cards, I used only cuts from the Joys of the Season cartridge. When I saw the snow globe cut, I knew I wanted to use it. Then I thought, what goes better in a snow globe than a snow man? This cute little guy also needed some snow falling around him, but I wanted some sparkle too so I used jewels as the snowflakes. For the joy card, I chose the elegant snowflake cut because I thought it went so well with the basic grey papers I wanted to use. I added some sparkle to the snowflake by brushing stickles over it.


Wednesday, June 29, 2011
Winter Wonderland Layout
For my assignment, I got to play with the Winter Frolic cartridge. This cart is jam packed with fun Christmas and winter themed cuts. When I saw the little boy cuts on this cartridge, they reminded me of my little boy, and I had just the pictures to go with them. I started my page by cutting the brown patterned paper to look like the ground, and placed it at the bottom of my page. Then using glue and the white flocking, I created “faux snow” along the edge of the ground. I cut the snowman at 3.25” and also covered him with the flocking. The sleigh boy was cut at 3.75”, and the snowball boy was cut at 4.75”. I cut the snowflake at 3.5” and added some sparkle with the glitter. The title was cut at 2” and raised with foam squares for dimension. I thought the mitten border was just precious, and I cut it at 1.25”. Whether you are scrapping Christmas photos or wintertime photos, this cartridge is a must have!


Wednesday, June 22, 2011
Creating a custom background
For this project, my assignment was to use the Wall Decor cartridge and Design Studio to create a background for a layout. This is actually much easier than it sounds. First, decide which image you want to use and what size you want it. Open it in Design Studio, and place as many as you want to use onto your virtual mat. Next, use the nudge feature to position all of your images so that they are touching one another. Make sure you check the "welding" box for each image, then simply cut it out.
I chose the butterfly image, set at 1.5 inches. I layered this over the mustard colored paper, which was over another sheet of black cardstock. Then I matted my photos, positioned them on the page, and added the flowers. The title was cut from the Home Decor cartridge set at 2 1/8". The orange scalloped border was made using the Accent Essentials cartridge set at 1", and then manipulated and welded together using Design Studio.

Wednesday, June 8, 2011
My first fabric project using the Cricut
I had the chance to work with the Fall Seasonal cartridge and my assignment was to make a tote bag. I was instantly drawn to the flamingo cut. I started by ironing Heat and Bond to the back of my fabric pieces. Next, I cut the white polka dots using the Accent Essentials cartridge set at 2", and cut the flamingo from the Fall Seasonal cartridge set at 11 1/2". Then I ironed them onto my tote bag. I added some pom pom trim around the top, and a pretty pink feather as his wing. It is so easy to make your own personalized tote bags with the cricut.
I have to admit, I was a little hesitant about cutting fabric in my cricut machine. I actually found out, it's quite easy! Just make sure you back your fabric with heat and bond to make it sturdier. Use a fresh blade and a fresh mat. I set my blade depth at 6, my pressure at 3, and my speed at 3. Also, use the multi cut feature set at 2, to make sure the cut goes completely through the fabric and the heat and bond. That's it! Easy enough, so don't be afraid to try it.

I have to admit, I was a little hesitant about cutting fabric in my cricut machine. I actually found out, it's quite easy! Just make sure you back your fabric with heat and bond to make it sturdier. Use a fresh blade and a fresh mat. I set my blade depth at 6, my pressure at 3, and my speed at 3. Also, use the multi cut feature set at 2, to make sure the cut goes completely through the fabric and the heat and bond. That's it! Easy enough, so don't be afraid to try it.
Tuesday, May 31, 2011
Over the Hill Party set

I had no idea how many fun cuts were on the Life’s a Party cartridge until I started flipping through the book. This cartridge is awesome for just about any kind of party! There are so many cool projects you can create with it.
I will be perfectly honest here and tell you, I will be the big 40 this year, so that was my inspiration for my party set.
I started with the tombstone, which I cut at 11”, and then decided to perch the vulture on top (cut at 5”). The skulls around the bottom of the tombstone weren’t part of that cut. They actually are in the section with the pirate party cuts, but that’s another great thing about this cartridge, you can mix and match different embellishments. The wording was cut from Plantin Schoolbook, set at ¾”.

The next thing I made was the invitation. I cut it at 5.5”. The brackets are actually from the “RIP” cupcake topper, but I thought they looked great on here also.
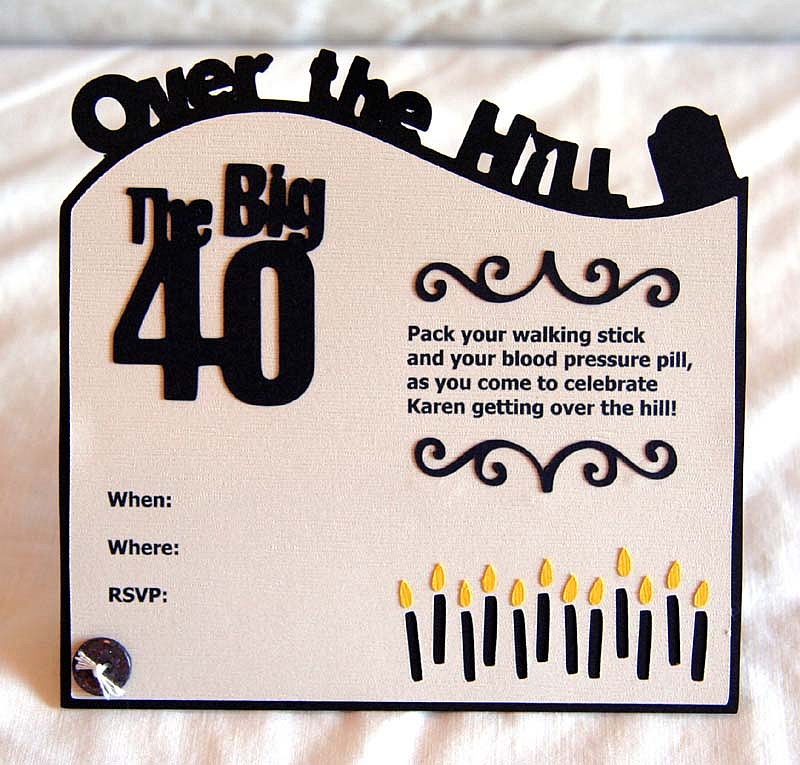
And what’s an over the hill party without a couple of jabs at the birthday girl/guy? The glasses were cut at 4” and the favor/gift box was cut at 10 ¾”.


When creating my tombstone centerpiece for my over the hill party set, the vulture gave me a bit of a problem. After I perched him on top, he started to droop forward. I came up with an easy fix for this. I simply cut two strips of cardstock, glued them together for strength, and adhered them to the back of my vulture and tombstone to act as a brace. No more drooping!

Wednesday, May 18, 2011
How to make a shaped card with your Cricut
Making a shaped card is so easy with your cricut and design studio.
Now place a second pear to the left of the first one on your mat:
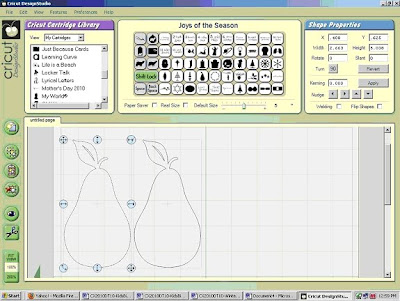
Third, check the Flip Shapes box for your second pear:
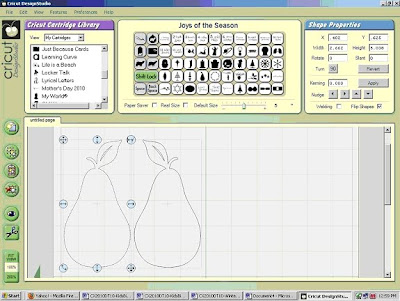
Now drag the second pear so that it overlaps with the first pear:
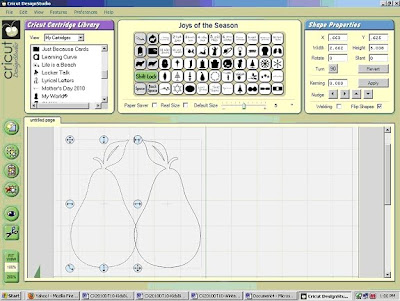
Check the Welding box for you second pear:
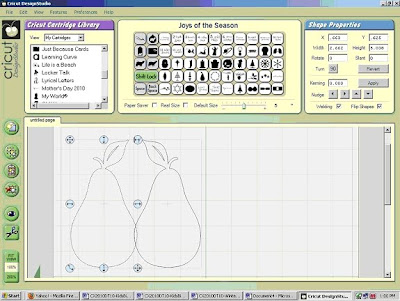
Now cut out your welded card and this is what you get:
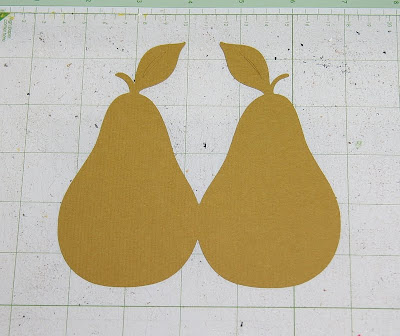
Score along the welded spot and fold over:
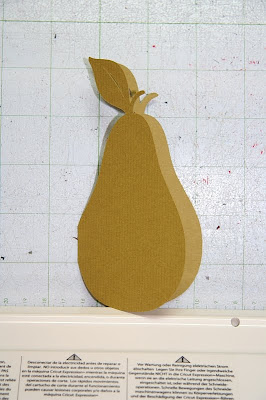 Now you can make your own shaped cards with pretty much any shape you want!
First, decide which shape you want to use. I chose the pear from "Joys of the Season". Next, place your pear on your virtual mat in design studio and check the welding box.

Now place a second pear to the left of the first one on your mat:

Third, check the Flip Shapes box for your second pear:

Now drag the second pear so that it overlaps with the first pear:

Check the Welding box for you second pear:

Now cut out your welded card and this is what you get:

Score along the welded spot and fold over:
 Now you can make your own shaped cards with pretty much any shape you want!
Wednesday, May 11, 2011
Farm Fun layout, and a little tip
My assignment for CX was to use the Create a Critter cartridge. I was so excited to use this cartridge because it is FILLED with the most adorable critters of all types. I had these pictures of my son at the Old Farmer's Days festival, so they were just perfect for this assignment. I started my layout by cutting the animal print paper into a scalloped circle using the Accent Essentials cartridge set at 11.25". I cut the striped paper and adhered it to the right hand page, then adhered the scalloped circle on the left side. I placed my photos over that, then created my title using the Old West cartridge set at 2.5". Then came the fun part, the critters! Both the sheep and the chick were cut at 3". These were arranged over the silk flowers for contrast. The journaling tag and chunky brads were the finishing touches.

Many of your great Cricut cuts can be "lost" on your page if you are mounting them over patterned paper, or even a similar colored cardstock. A great way to make your cuts stand out is to mount them over a silk flower before mounting them to your page. It gives it great contrast and allows the eye to focus better on the cut.


Many of your great Cricut cuts can be "lost" on your page if you are mounting them over patterned paper, or even a similar colored cardstock. A great way to make your cuts stand out is to mount them over a silk flower before mounting them to your page. It gives it great contrast and allows the eye to focus better on the cut.


Wednesday, May 4, 2011
Cowboy Up! (and a tutorial)
I had the cutest picture of my youngest son dressed up as a cowboy for Halloween, so the Old West cartridge was the perfect thing for this page. This cartridge is absolutely filled with great western cuts. I started my layout by using the cartridge set at 1” to cut a stencil to be used with the glimmer mist along the bottom of the page. Then I layered my pieces of patterned paper and adhered my photo and ribbon. I cut the rope at 2 ¾”, the title at 3”, the hat at 1 ¾”, and the badge at 2”. Then I gave them a spray with the glimmer mist to give them a more aged appearance. I finished dressing my page with the epoxy brads.


We all know what great embellishments you can cut with your cricut, but you can also use that negative space to create stencils for glimmer mist, paint, chalk, etc.
I used the star cut from the Old West cartridge and cut a row of stars on my cardstock. Then I placed this stencil over my background paper, covered the rest of my background paper with another piece of cardstock, then sprayed my glimmer mist over the stencil.


Friday, August 27, 2010
CreativeXpress DT work
These projects made it to the CreativeXpress blog, so I can post them here now.

Assignment was to use the Tie the Knot cartridge.
You can see my tutorial for making the roses HERE.

Assignment was to use the Superman cartridge.

Assignment: Mother's Day cartridge
Friday, July 31, 2009
My latest CX projects
My assignment last month for CreativeXpress was to use the new Teacher's Pet line of papers, ribbons and stamps. I just love the bright colors in these papers, they work well with all sorts of projects.


My first project is a layout I made with Turner's kindergarten graduation picture. This layout also includes cuts from the Locker Talk cricut cartridge, and the Hello Kitty font cartridge:

My second project was to make a couple of cards for a student to give his teacher. The first card features a hopscotch die cut from the Locker Talk cartridge. The second card uses the apple stamp and best teacher stamp from the Teacher's Pet line:
Saturday, June 20, 2009
DT Projects
I meant to do this sooner, but you know how that goes!
These are my CreativeXpress projects from last month. My assignment was to use the new Cricut Lyrical Letters cartridge.
Mardi Gras:

I wanted this page to convey all the fun and excitement of Mardi Gras. I chose the lilac, bumblebee, and limeade paper packs because the traditional colors of Mardi Gras are purple, yellow, and green. After cutting my papers in various sized strips and adhering them to my page, I used the Joys of the Season cartridge to make my beads along the top. I believe those beads were designed to be a Christmas tree garland, but they worked perfectly for Mardi Gras beads! The title letters were cut using the Lyrical Letters cartridge and were mounted on the frame shape from the Storybook cartridge. I used the Fleur de Lis from the Accent Essentials cartridge as my accents because the Fleur de Lis is a traditional symbol of Louisiana, and especially New Orleans. All of my elements were mounted on foam tape for dimension, and trimmed with lilac jewels for an extra touch of bling and fun.
It's Your Day Card:

The Lyrical Letters cartridge has several great images to use for cards. I chose this pear image because it makes me happy! I cut it at 6” real dial size and covered it with the glitter for some fabulous sparkle. The sentiment is also from the Lyrical Letters cartridge and was cut at 2”. I used a trio of eyelets for an added decorative element along the bottom. This cheery card would brighten anyone’s day!
Happy Halloween Card:
(Out for publication, be back soon!)
The Lyrical Letters is such a great cartridge to have because it has many greetings on it, in addition to the very versatile font. I chose the “Happy Halloween” greeting with the accompanying spider to make this card spooktacular! I created the pumpkin shaped card by using the pumpkin from the PDDU cartridge and welding it stem-to-stem using Design Studio. Then I cut a slightly smaller pumpkin out of my patterned paper and adhered it to my card. The web is from the Wild Card cartridge. I cut one web at 5”, and then cut it apart to use at two different spots on my card. The green ribbon was used to simulate the vine of the pumpkin. I used a tiny square of mounting tape under the spider to make it seem like he was really suspended on the web, and the jewels are there just because they are so much fun!
Tuesday, November 4, 2008
My first Design Team projects
The September DT projects are up at CreativeXpress, so I can officially show them off now. My first month was quite hectic since I had to learn the Expression machine AND learn Design Studio for my assignment. Next month should be a lot less stressful.


For these projects, I had to use Basic Grey Granola papers, and the layout had to use the new Cricut Blackletter cartridge:
Wednesday, August 27, 2008
Shouting from the rooftops!
I made it onto the Creative Express design team! After 4 years of applying, and 3 years of rejection, I finally made it. I'm so excited to be a part of such a great team and I can't wait to get started!
Subscribe to:
Posts (Atom)