Showing posts with label cricut. Show all posts

Thursday, May 10, 2012

Teacher Appreciation Gifts

I like to give the teachers something they can use and reuse every year. This year I found these cute insulated cups.  I filled the cups with different berry flavored drink mixes, added a bow around the straw, and hung the strawberry shaped tag off the top.  These little gifts come together really quick, and I think it's something they will actually get some use out of.


Monday, October 24, 2011

Woo Hoo, Witchy Woman...

...See how high she flies.

Susan chose the witch from Happy Hauntings for this weeks challenge at BBTB2.
I love all things Halloween, so I really enjoyed this weeks cut.
Now normally, I'm an angel (cough cough), but I broke out my alter ego for this project :-)
Come join us this week with your witchy creation!

PP - BG Eerie, and BG Crude
Letters - My Little Shoebox
Charm - Frost Creek
Witch cut at 2.75"


Monday, October 10, 2011

What hill? I don't remember any hill.


Agnes chose the cut at BBTB2 this week and she chose the vulture from Life's a Party.

I will be perfectly honest here and tell you, I will be the big 40 this year, so that was my inspiration for my party set.

I started with the tombstone, which I cut at 11”, and then decided to perch the vulture on top (cut at 5”). The skulls around the bottom of the tombstone weren’t part of that cut. They actually are in the section with the pirate party cuts, but that’s another great thing about this cartridge, you can mix and match different embellishments. The wording was cut from Plantin Schoolbook, set at ¾”.


The next thing I made was the invitation. I cut it at 5.5”. The brackets are actually from the “RIP” cupcake topper, but I thought they looked great on here also.
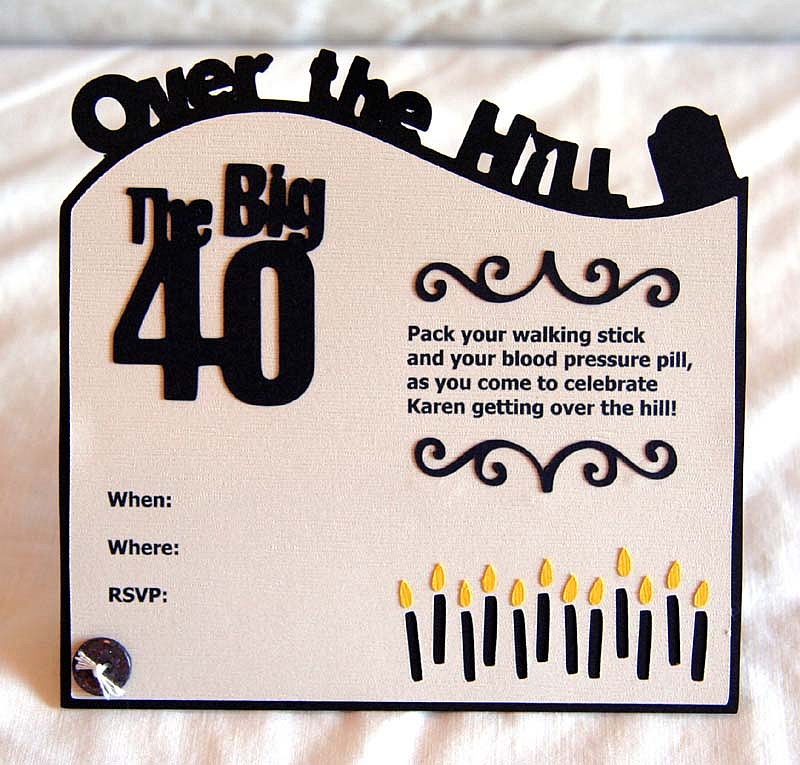

And what’s an over the hill party without a couple of jabs at the birthday girl/guy? The glasses were cut at 4” and the favor/gift box was cut at 10 ¾”.


Monday, September 12, 2011

How Corny!

That's me, corny. Especially with my blog post titles ;-)
Jeri picked the challenge at BBTB2 this week, and she picked any 3-D box from Tags, Bags, and Boxes. I used the cake slice box, but since the cooler weather has me in a fall frame of mind, I turned it into a giant candy corn. Come join the challenge this week, we love seeing your work.


Monday, August 15, 2011

Play Ball!

It was my turn to choose the cut at BBTB2 this week, and I chose the baseball from Life's A Party because I had my son's team pictures to scrapbook.
Come join the challenge this week. If you don't have this cartridge, you can use any baseball from any cartridge. You could win a blinkie for your own blog!

Cartridge - Life's a Party
Paper - Echo Park "Little Boy"
Stars - Pressed Petals Chip Chatter

Wednesday, August 10, 2011

Where's My Cape?

When I found out my assignment was to use the Superman cartridge, I honestly thought I would have a tough time coming up with a layout to use it on. But, when it arrived and I looked though the handbook, I realized there’s so much more to it than just the man of steel. When I saw the Supergirl cut, my wheels started turning. What mom out there ISN’T a supermom? We all need our own cape!

Monday, August 8, 2011

Sweetie Pie!

Krista chose the cut for BBTB2 this week, and she chose the pie from Paper Doll Dress Up. I modified the cut a little by making the top crust a lattice, and adding cherries that I made using a circle punch. Come join us this week and post your own pie project. We love it when you play along!

Cricut cart - Paper Doll Dress Up
Font - Minya Nouvelle 16
Flowers - Prima
Pearls - Queen and Co.

Wednesday, August 3, 2011

Three Dimensional Christmas ornaments, and a little tip.

When I saw the lacy cuts on the Trim the Tree cartridge, I knew I wanted to create something elegant with them. To make each ornament, I cut the background four times, and the lacy portion 4 times. I adhered each lacy part to each background part. That gave me 4 complete cuts. I took each cut and folded it down the middle. I then took all four folded cuts and glued them together back to back, with a ribbon loop glued into the middle. I dry brushed the stickles over the ornaments for added sparkle and shine.


I just love the versatility of Stickles. Depending on how you use them, you can get glittery dimension, or you can get an all over soft sparkle.

For dimension, just apply the Stickles straight out of the bottle, like this:


For an all over soft sparkle, pour a bit of Stickles out of the bottle, then dry brush the Stickles over your project:


Now you have two totally different looks, using only one product:

Wednesday, July 27, 2011

Betty Lou Layout

I love all things 50’s so this cartridge was a must-have for me! There are so many iconic images on this cart, I had trouble picking which ones I wanted to use, but when I decided to scrap a picture of my 57 Chevy, there was the perfect cut in the manual. This cartridge also has an awesome 50’s style font. That alone makes this cartridge worth having, the tons of other cuts are just an added bonus!

I started my layout by cutting two rectangles of the patterned paper and positioning them on my white background. Then I added the die cuts and title. I added the jewels in the corners because I just have to have some bling on almost every project. Lastly, I added the three stripes in the bottom corner because they somehow remind me of a car. (I don’t know how, but they do!)


Monday, July 25, 2011

A Sweet Card

This week's cut for BBTB2 was chosen by Maria. She chose the ice cream cone from Sweet Treats. Once again, I had to improvise because I don't have that particular cartridge. I used the ice cream cone from A Child's Year. Please come show us your new creations with this cut and you can win the BBTB2 Project of the Week blinkie for your blog!

Cricut cart - A Child's Year cut at 5"
Embossing folders:
Cuttlebug Divine Swirls and Cuttlebug Swiss Dots
Jewels - Doodlebug Limeade

Wednesday, July 20, 2011

Kid's Birthday Cards

Since my assignment was to make birthday cards for children, I knew I wanted to make them bright, cheery, and fun. I chose the dog and cat from the Create-A-Critter cartridge because they are so cute. I also used the dog dish and cupcake from the same cartridge so this little doggie would have a birthday treat. Since these were meant for kids, I didn’t want to make them too fussy. I stuck with simple shapes and bright colors, because that seems to appeal to children. (All cuts on both cards came from Create-A-Critter)

Monday, July 18, 2011

Mrs. Pinsonat's Penguins

Actually, it's just one penguin! Melissa chose the challenge over at BBTB2 this week, and she chose the penguin from Jolly Holidays. I don't have that cartridge, but there was a cute little penguin on Create-A-Critter. My little guy is Just Chillin' by his igloo. Come join the challenge this week, we love to see everyone's work!

Cricut cartridge - Create-A-Critter
Cut sizes:
Penguin and words - 1.75"
Igloo - 2.25"
Patterned paper - BG Dasher
Snowflake - Making Memories


Wednesday, July 13, 2011

Children's Invitations

I used the Old West cartridge for all of my cuts on both invitations. I love the great cuts on this cartridge and I knew they would make perfect kid’s invitations. On the Wanted invitation, I used the great cuts and fonts to make a “Wanted” poster for a western themed birthday party. I carried on that theme with the farm party invitation by using the great barn cut. When I saw those barn doors, I decided to make them actually open and find the wording inside the barn.

Wednesday, July 6, 2011

Winter Cards

For my winter themed cards, I used only cuts from the Joys of the Season cartridge. When I saw the snow globe cut, I knew I wanted to use it. Then I thought, what goes better in a snow globe than a snow man? This cute little guy also needed some snow falling around him, but I wanted some sparkle too so I used jewels as the snowflakes. For the joy card, I chose the elegant snowflake cut because I thought it went so well with the basic grey papers I wanted to use. I added some sparkle to the snowflake by brushing stickles over it.


Wednesday, June 29, 2011

Winter Wonderland Layout

For my assignment, I got to play with the Winter Frolic cartridge. This cart is jam packed with fun Christmas and winter themed cuts. When I saw the little boy cuts on this cartridge, they reminded me of my little boy, and I had just the pictures to go with them. I started my page by cutting the brown patterned paper to look like the ground, and placed it at the bottom of my page. Then using glue and the white flocking, I created “faux snow” along the edge of the ground. I cut the snowman at 3.25” and also covered him with the flocking. The sleigh boy was cut at 3.75”, and the snowball boy was cut at 4.75”. I cut the snowflake at 3.5” and added some sparkle with the glitter. The title was cut at 2” and raised with foam squares for dimension. I thought the mitten border was just precious, and I cut it at 1.25”. Whether you are scrapping Christmas photos or wintertime photos, this cartridge is a must have!


Wednesday, June 22, 2011

Creating a custom background

For this project, my assignment was to use the Wall Decor cartridge and Design Studio to create a background for a layout. This is actually much easier than it sounds. First, decide which image you want to use and what size you want it. Open it in Design Studio, and place as many as you want to use onto your virtual mat. Next, use the nudge feature to position all of your images so that they are touching one another. Make sure you check the "welding" box for each image, then simply cut it out.

I chose the butterfly image, set at 1.5 inches. I layered this over the mustard colored paper, which was over another sheet of black cardstock. Then I matted my photos, positioned them on the page, and added the flowers. The title was cut from the Home Decor cartridge set at 2 1/8". The orange scalloped border was made using the Accent Essentials cartridge set at 1", and then manipulated and welded together using Design Studio.

Monday, June 20, 2011

Sunny Days

Susan chose the cut for the weekly challenge at BBTB2, and she chose to use the "Sunny Days" cut. I used the one off of the Create-A-Critter cartridge for my card, which was made entirely of scraps. I'm bad about saving little pieces of paper, and never using them. I have quite a collection now, so I definitely need to thin the herd.
Come join us at BBTB2 this week. If you don't have a cartridge with this phrase on it, you can always make your own!

Wednesday, June 8, 2011

My first fabric project using the Cricut

I had the chance to work with the Fall Seasonal cartridge and my assignment was to make a tote bag. I was instantly drawn to the flamingo cut. I started by ironing Heat and Bond to the back of my fabric pieces. Next, I cut the white polka dots using the Accent Essentials cartridge set at 2", and cut the flamingo from the Fall Seasonal cartridge set at 11 1/2". Then I ironed them onto my tote bag. I added some pom pom trim around the top, and a pretty pink feather as his wing. It is so easy to make your own personalized tote bags with the cricut.


I have to admit, I was a little hesitant about cutting fabric in my cricut machine. I actually found out, it's quite easy! Just make sure you back your fabric with heat and bond to make it sturdier. Use a fresh blade and a fresh mat. I set my blade depth at 6, my pressure at 3, and my speed at 3. Also, use the multi cut feature set at 2, to make sure the cut goes completely through the fabric and the heat and bond. That's it! Easy enough, so don't be afraid to try it.

Tuesday, May 31, 2011

Over the Hill Party set


I had no idea how many fun cuts were on the Life’s a Party cartridge until I started flipping through the book. This cartridge is awesome for just about any kind of party! There are so many cool projects you can create with it.

I will be perfectly honest here and tell you, I will be the big 40 this year, so that was my inspiration for my party set.

I started with the tombstone, which I cut at 11”, and then decided to perch the vulture on top (cut at 5”). The skulls around the bottom of the tombstone weren’t part of that cut. They actually are in the section with the pirate party cuts, but that’s another great thing about this cartridge, you can mix and match different embellishments. The wording was cut from Plantin Schoolbook, set at ¾”.


The next thing I made was the invitation. I cut it at 5.5”. The brackets are actually from the “RIP” cupcake topper, but I thought they looked great on here also.


And what’s an over the hill party without a couple of jabs at the birthday girl/guy? The glasses were cut at 4” and the favor/gift box was cut at 10 ¾”.


When creating my tombstone centerpiece for my over the hill party set, the vulture gave me a bit of a problem. After I perched him on top, he started to droop forward. I came up with an easy fix for this. I simply cut two strips of cardstock, glued them together for strength, and adhered them to the back of my vulture and tombstone to act as a brace. No more drooping!

Monday, May 23, 2011

Flying High

Donna chose the flying bird from Florals Embellished for the challenge at BBTB2 this week. I made something a little different than my usual card this week. It's still a card, but it comes in it's own coordinating gift box. It would be a great "dressed up" way to give a gift card. Come join us for the challenge at BBTB2 this week!